Replacing Marine Vinyl on Pontoon Seats : Step-by-Step Guide
David Goldman

If the marine vinyl on your pontoon seat is in rough shape, you may need to look at getting it replaced. Don’t worry though, it doesn’t have to be a daunting project or time investment.
When marine vinyl fabric is used for boat seats, it generally lasts a long time. However, if there is any damage, or if it hasn’t been replaced in some time, you may need to consider replacing the marine vinyl.
If you're considering replacing the marine vinyl on your own, here's a comprehensive guide to help you complete the process with minimal tools. It may seem intimidating at first, but if you follow the steps we have laid out for you, you’ll have some fresh vinyl on your seats in no time.
Tools Required to Replace Marine Vinyl

As I mentioned, we’re going to be replacing the vinyl with minimal tools and material. Here’s what we’ll need to complete the project:
- Screwdriver
- Pencil
- Tape
- Scissors
- Staple gun
- Marine vinyl Fabric
Now that you have all the necessary tools, we’re going to go through step by step procedures on how you can replace the vinyl.
Determine How Much Vinyl is Needed
The first step is figuring out how much marine vinyl you’ll need to cover your seats. The best way to do this is to take apart your existing seat. If you are replacing the vinyl on several seats, remove the vinyl from all of the seats you’re replacing, so that you can make sure you’re getting an accurate measurement.
The old vinyl is likely stapled onto the base of the seat. This is where the screwdriver may come in handy. Use the screwdriver to help pull out the existing staples that are attaching the vinyl to the base of the seat.
Once you have the vinyl removed, you’ll be able to assess both the vinyl and the foam. At this point, you already know that you want to replace the vinyl, but it’s important to make sure that the foam is still in good shape. If it’s deteriorating, you’ll want to make sure you get new foam to replace it as well.
Now you’ll need to measure the vinyl to figure out how much you need. If the size of the old vinyl seems to fit right, then you can measure the vinyl to determine how much new vinyl you’ll need to purchase in order to replace it.
Purchase Your Vinyl
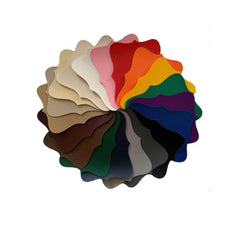
Now that you have a good measurement, the next step is to get the Marine Vinyl Fabric. We’re biased, but we believe we have some of the best marine vinyl at MarineVinylFabric.com. When you’re on the product page, you can select the color you’d like and then enter the number of yards you’ll need to replace your seats.
I would recommend ordering just slightly more vinyl than what was previously used for the seats. The reason for this is that it was likely stretched very tight, without much excess vinyl.
If you’re not quite able to stretch it as much, you’ll end up with a piece of vinyl that’s just slightly too small. If you use a little more than what was previously used, you can ensure you have enough vinyl, and you’ll always be able to cut off excess vinyl if you use too much.
Our marine vinyl is 54” wide. All you’ll need to do is determine which color you’d like and then specify the number of yards you’ll need based on your measurement.
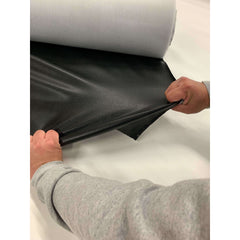
Lay Your Vinyl Flat in the Sun
Your vinyl is going to come to you on a roll, which means it won’t lie completely flat at first. This isn’t a problem though, because you’ll be able to easily flatten it out.
The best way to do this is to simply lay it out flat in the sun. The heat from the sun will allow the vinyl to flatten out. It will also help remove any wrinkles, which is also helpful. Once the vinyl has flattened out, then you can move to the next step.
Measure and Cut Vinyl
Once you have your vinyl flattened out, then you can measure and cut it. There are a few different directions you could go here.
The first way is to use a tape measure and mark off the size you’ll need based on your measurements from when you ordered the vinyl.
The other route you could go is to lay the old vinyl on top of the new vinyl and trace around it. This will be a little quicker and would make sense if you’re planning on using a piece of vinyl that’s exactly the same size as the old piece.
As mentioned before though, it might be worth cutting your new piece slightly larger than the old piece that was used. That will ensure you can stretch the vinyl enough to fit the seat correctly. If you have excess vinyl, you can always cut it off when you’re done.
Once you have your measurements marked or the vinyl traced with a pencil, you can simply cut it out using your scissors. Then you’ll be ready to attach the new vinyl to the boat seat.
Center the Foam on the Boat Seat
If the foam that was previously used for the boat seat is still in good shape, then you can reuse that. If not, you’ll want to consider getting a new piece of foam to use.
Center the foam on the boat seat, and make sure it’s in the right place. Once you attach the vinyl, you won’t be able to adjust this.
You can use some adhesive on the wooden base and the foam to keep it in place, but it’s not entirely necessary. The vinyl will be tight enough around the foam and base to keep everything snug.
Attach the vinyl
Now you’re ready to actually replace the vinyl on your pontoon seat. At this point, you should have the correct size vinyl cut, as well as the foam in position on the base of the seat.
The easiest way to do this is to lay the marine vinyl down on the ground to start. Then with the foam side down, you can place the foam and wooden base of the seat on top of the vinyl. Make sure it’s centered on the vinyl.
After that, you’ll want to pull the vinyl around the back of the seat base. Start in the center of one specific side and make sure you pull the vinyl as tight as you can. The tighter you can pull the vinyl around the seat, the fewer wrinkles you’ll have, and the better it will look.
In that one specific spot, use your staple gun to staple the vinyl to the wooden part of the seat base. Throw a couple of staples in right away to make sure it holds up in that one spot.
To make the vinyl easier to work with, do this on each of the four sides before adding more staples in between. Again, with each side, make sure you’re pulling the vinyl as tight as you can before stapling the vinyl to the wood.
Once you have the vinyl stapled in the middle of all four sides, continue to add more staples around the entire perimeter of the seat. Using a staple about every inch to a few centimeters will ensure the vinyl stays snug and in place.
Depending on how much vinyl you use, you may end up with some excess vinyl on the bottom side of the seat. You’ll want to make sure you remove that, otherwise, the boat seat won’t sit entirely flat. Use your scissors to trim off any excess vinyl on the bottom end of the seat.
Summary
Replacing the marine vinyl on your pontoon seats may seem to be a intimidating task at first, but it is a manageable task. If you follow the steps and guideline mentioned above, then it becomes as easy as child’s play.
Here are the main steps you’ll need to follow to replace the vinyl successfully:
- Determine how much vinyl is needed. Use the old piece of vinyl as a size reference.
- Purchase your marine vinyl
- Lay your vinyl in the sun to flatten and remove wrinkles
- Measure and cut your vinyl
- Center the foam piece on the base of the boat seat
- Attach the vinyl with a staple gun. Make sure that the vinyl is pulled as tight as possible around the seat.
After completing these steps, you’ll have successfully replaced the Marine Vinyl Fabric and have a seat that looks brand new.
MarineVinylFabric.com offers a wide selection of premium marine vinyl products to transform your boat's seats into comfortable and stylish ones. You can reach us at 312-300-6737 or through our Contact Us page.