The Ultimate Guide For How To Enclose Your Porch With Clear Vinyl
David Goldman


Everything You Need To know About Installing A Clear Vinyl Porch Enclosure.....
Hey you! Yes you! Do you have a porch, gazebo, or a hot tub that you want to use all year round? Want to save some money on your heating bills by building DIY storm windows? Want to block out the weather, pollen and strong winds? Well then you have come to the right place. This guide will walk you through everything you need to know to tackle the job.
First let’s start by discussing your options.
WINDOWS
If you have the big bucks you can install screen porch windows. This process would require framing walls and installing glass windows. This option will add a new room to your house, but can come with a price tag between $10,000-$40,000 depending on the size of the porch. This option looks great, but the price tag is more than most people have to spend on this type of project. Let’s be honest if your reading this article you most likely want the more affordable options you can do yourself.

SPLINE
Many porches already have a screen. If you want to simply remove and replace the screen with some clear vinyl we would suggest the 10, 12, 16 or 20 Gauge clear vinyl, as it’s thin enough to fit into the channel with the spline. The 30 or 40 gauge vinyl is too thick and won’t fit into the channel. Most people who have screens in their porch like to use those screens in the summer time so they prefer to create a second window covering like a storm window that can be easily removed or added based on the weather conditions. This is where most people use the 30 and 40 Gauge Vinyl as the added thickness ends up being more durable and creates additional insulation, which is ideal in the wintertime.
Thanks John Engel for this helpful tip to help install spline: First hold the vinyl up, place a piece of tape at the top middle above the spline track. Insert a small piece of spline, 1", 2", in the top middle of the vinyl. Do the same at the bottom middle, pulling it as taut as you can. Do the same for the middle left and right. Do not try to "roll the spline" down the track. This will stretch the vinyl and make it impossible to avoid wrinkles. Now, choose the top left 1/4 panel. Take a length of spline and insert it next to the two middle holding splines. Now, take one of the splines and hold it toward the corner. At the halfway point to the corner, Take your spline tool and "punch" the spline into the channel. Now, do the same for the other spline. Continue to "punch" the spline at halfway points between "punches". Go back and forth duplicating the punches on each spline. Now do the same for the other 3 quarter panels. When the halfway points between punches are an inch or two long, roll them out, rolling in both directions. Punch, the spline in as to not stretch the vinyl.
STAPLED WOOD FRAMES
Some people really like building wood frames that they can easily pop in and out. These are usually made out of 1”x2” or ¾” molding depending on the size of the opening. Most people will simply cut the wood to the size of the window opening or the size of the vinyl, as some openings are bigger than the width of the vinyl. We will discuss how to handle larger openings in greater detail shortly. Once the wood is cut people will use wood glue and either screws or a nail gun to build the frame. The vinyl is than stretched over the frame and stapled in place. This method is great for people that want to keep their vinyl up year round. It’s not as ideal for people that want to store the panels away in the summer. These wood panels can get pretty large and storing them can be difficult taking up valuable space in the garage or shed.
![]()
GROMMETS (Recommended)
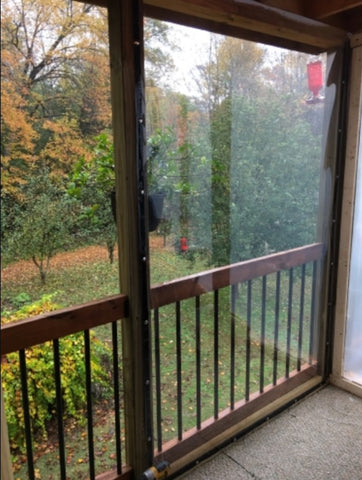
This is the most common and recommended method for enclosing a porch. It’s also the easiest and cheapest method. Using grommets to install a porch enclosure also allows for the easiest storage as it can simply be rolled up. Some people roll up the vinyl and tie it to the underside of the porch when it’s not in use and some people will remove it completely and store it in the garage or shed.
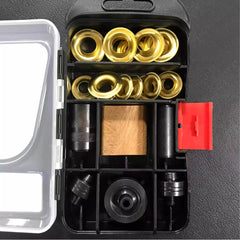
You can get 3/8” Grommets and a Grommet Kits HERE. Important please make sure you use stainless steel or brass grommets or something that won’t rust. Don’t be scared of this approach as it simply a glorified hole-punch. It’s an easy 2-step process using the kit. Step 1: Take the circle hole punch and use a hammer to “stamp” out the hole through the vinyl placing it about an inch from the outside edge. It’s like a small heavy-duty cookie cutter that you are hitting with a hammer. Step 2: Place the metal grommet through the hole in the vinyl and place the second part of the grommet on the other side sandwiching the vinyl. Using the hammer tap them together until they are tightly fastened. Install these roughly 18" apart or less to increase the strength and durability of your panel. Please note the closer the grommets are placed together the tighter the seal you will have around the window. Once the grommets are installed take a 1/2” washer with a small enough hole for a screw to go through it.
On YouTube there are some how to videos that show people placing gaff tape around the edges before installing the grommets. We have found most people skip this step in the process and have no problem with the install. We feel it simply adds more work. All you need to do is screw and unscrew your panels and they come right off.

This method is less commonly used, but is a great method for creating a tighter seal around the windows. Some people will simply get a bulk supply of heavy duty Velcro and using the self-adhesive stick it right to the clear vinyl and the frame. The problem with this method is when its gets warmer outside the glue holding the Velcro can peel away. Some people have sewn/stapled the Velcro onto the vinyl and stapled the Velcro directly to the wood to help keep it in place. This method does allow for easy storage, but when the material is taken down the ugly Velcro remains collecting dirt and debris. Many people like to use both the grommet and Velcro approach together.
Snaps are installed similarly to the grommets. The benefit to snaps is you don’t have to keep making new screw holes year after year and it looks very clean and professional. The down side is the clear vinyl will shrink slightly overtime as the plasticizers in the vinyl will dry out. When this happens the snaps may not line up making the process more difficult over time.
As we mentioned previously many people don't love the idea of putting screw holes in their wood frames or decks year after year. This is a new option that will work well with grommets or wood frames. This is a method that works great for an easy pop in and out clear vinyl window. Simply screw in the base and leave it in the wood (see pictures below). Note you may need to pre-drill the holes to make it easier. You can then easily hang your clear vinyl that has grommets in it or take your wood frames with clear vinyl stapled to it and simply hang them and secure them with the bolt or wing nut. Please keep in mind clear vinyl can shrink 1-3% over time so please keep this in mind when attaching it with this method. as you want to make sure your holes line up even if it has some slight shrinkage.
| AstroGuard Fastener | Stainless Steel Storm Panel Screw Kit |

|

|
Note these are affiliate links and we will get a small commission if you buy through these links.
Measuring Tips - How Much Do I Need To Order?
Now that we have helped you narrow down your desired method of installation lets help you make sure you order the right amount. There are 2 directions people hang the vinyl. Most people prefer to hang it up vertically while some people prefer to run the clear vinyl horizontally (sideways). The reason most people run the vinyl vertically up and down is because it makes the sheets easier to handle and store. It also more evenly distributes the weight of the vinyl while it hangs. The only downside is there are more overlapping seams. We will discuss how to handle these shortly.
There are 2 types of porch enclosures. The first type of porch enclosure is a screened in porch with partial walls and screened windows. The second type of porch enclosure is the kind that is wide open with a few support beams holding up the deck above and is usually wide open.
Screened In Porch
When you have the first type of porch that is already mostly enclosed you can normally just measure each opening and assuming no opening is larger than 54” simply add up the shortest ends to calculate the total amount you will need. For example if you have 5 windows 48”x30”, 52”x40”, 42”x30”, 40”x40” and 23”x50”. You would simply add up 30+40+30+40+23=163 inches. To calculate that into yards simply divide by 36” (163/36 = 4.5 yards). So you would need 5 yards to cover these openings. Hate math? Call us at (312) 300-6737 and we can help you figure this out.
Wide Open Porch
Now most people don’t have an existing screened in porch so lets look closer into the second type of porch that is wide open. This is usually wide open with the exception of a few support posts. First start by measuring the distance between the posts. If they are 54” apart or less your vinyl can easily be installed from post to post. Saying that post openings are usually much larger. If the posts are 72” apart you can get a thinner 20 Gauge vinyl that is 72” wide to cover the distance between the posts, but often times most posts are much further apart. Now let’s start the measuring process.
Start by measuring the openings length and height. Let’s say the opening is 20 feet long and the clear vinyl is 54” wide (4.5 feet). You would start by dividing 20/4.5 (or 240”/54”), which equals 4.44. That means you will need 5 vertical panels to cover the 20-foot length. Now let's take the measurement of the height of your porch. For this example let's say the height is 8 feet tall from the ground to the ceiling. Now you know you need 5 panels each 8 feet long. So multiply 8x5 and you get 40 total feet. To calculate that into yards divide that number by 3 (40/3 = 13.3 yards). Since most places only sell the material by the yard you will need 14 total yards to cover a 20-foot opening. Repeat this process for each side or simply add the total feet of each side together when you start your calculations. If you have two sidewalls that are both 10 feet wide and the front wall that is 20 feet long you can add each side up to get 40 feet wide and than divide that number by 4.5 to get the count of panels needed. Some of you might be asking what happens if I get a 72” wide vinyl how many panels will I need? Simply divide the number by 6 (20/6 or 240”/72”= 3.3). We always recommend adding a little extra, as this calculation does not account for overlap of the material, which many people will likely need. If you still have questions about how much you need feel free to contact our sales team at 312-300-6737 and we can help you with your calculations.
Seams
Now lets help you figure out how to handle those dreaded seams. Some people have had success just overlapping the panels, as the vinyl will naturally want to stick to itself like a giant window cling. As long as the vinyl is securely in place the overlap should work. Granted if there are stronger winds this can open up and let in the cold air. For some people that is simply enough, but others need a better solution. Remember for most of the following seam options we discuss below once the seams are joined together you will not be able to undo it. This is good usually for enclosures that will be up year round. If you plan on removing the clear windows seasonally we do not recommend this option, as the panels will be too large to handle.
Glue Seams
Clear vinyl can be glued using HH66 vinyl cement. There are also other 3M products that work well. It’s really important you check to make sure whatever glue you use is ok to use with plastic and vinyl. We have had lots of customers tell us they have had good success with HH66 glue. The only down size is many glues are not UV stable and will eventually begin to yellow in direct sunlight
Sew Seams
If you know how to sew and have a sewing machine this option might be perfect for you. You just need to make sure you have enough space to sew large pieces together. Many standard home machines can sew the 20 and 30-gauge clear vinyl with little problem (Disclaimer: that doesn’t mean it will work for everyone). We recommend a heavy-duty commercial machine if you plan on using the 40 gauge clear vinyl. Some companies will send the clear vinyl with paper interleafing between the layers of clear vinyl. Make sure to check if your vinyl will come with the paper. At www.MarineVinylFabric.com we sometimes add the paper to only smaller rolls. If you need the paper make sure you ask before purchasing. This makes the material easier to handle. Many people will sew right through both layers of the vinyl and paper and rip away and leftover paper. It’s also very important you use UV stable thread, as you don’t want the thread to fall apart right away from the harsh sun rays.
If you feel like sewing the clear marine vinyl is your best option than consider taking the next step and adding zippers. This will make storage easier and makes it easier to get a little fresh air if you want to “open a window”. Adding zippers is also a great method for making doorways.
Want to take an easier approach? Try using clear tape. This is easy to cut apart if needed. The only downside is it’s not usually UV treated and will yellow. This method will also look less professional and more homemade. It will still get the job done though. There are some heavy duty clear tapes that have UV protection.
Sew Canvas Frame
Some people who want a clean look will simply add canvas around the edges. Since most canvas comes 54”-72” wide you can sew this around the edges to create a frame around the clear vinyl creating a window. Once again this option is good for people who are willing to sew the material. Make sure you use a good canvas that is UV treated and mold and mildew resistant.
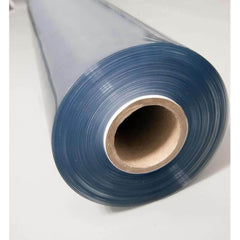
What clear vinyl thickness should I use for my project?
OK first off vinyl is not measured like steel. Many people think the thicker material has a lower gauge. THAT IS NOT TRUE FOR VINYL! For clear vinyl the higher gauge means the product is thicker. For example the 10 gauge clear vinyl is a little thicker than a shower curtain or 1/3 the thickness of a credit card (0.25mm). The 20 Gauge (0.5mm) is 2/3 the thickness of a credit card, but twice as thick as the 10 gauge. The 30 gauge is roughly the same thickness as a credit card. The 40 gauge is a little thicker than a credit card (1mm). The 60 Gauge is the thickness of 2 credit cards (1.5mm). Lastly the 80 Gauge is 2mm thick. this is commonly used in industrial applications like flaps in warehouse doors.
REMEMBER ALL CLEAR VINYL IS NOT CREATED EQUALLY. You want to make sure the clear vinyl you use is UV treated. Also if you live in a cold environment you need to check the cold crack rating. Our rating is -40F Cold Crack. This means our vinyl has been tested in -40F without cracking. Saying that in extreme temperatures if there is enough strong wind or a your snow blower shoots ice at the clear vinyl it could still crack, but under regular usage it should not crack.
10 Gauge Clear Vinyl
The 10 Gauge is out thinnest vinyl and is a cheaper option for many people. There are some porch window enclosure systems that only work with a 10 gauge vinyl. Some windows being installed with spline also need a thinner vinyl. This is a good option to create a cheap barrier, but may not hold up as long as the thicker vinyls. The sun will overtime dry out the plasticizers inside the plastic and that is when people notice change within the vinyl. As it dries out it may become dried out and eventually crack. It will take a long time for this to happen, but the thinner vinyls will naturally dry out a little faster.
20 Gauge Clear Vinyl
The 20 gauge should be used in only 3 situations. The first has already been mentioned above when the vinyl is being installed with spline. The second is when you need a 72” wide product to cover a larger opening. If we could find a manufacturer that could produce a wider and thicker product we would offer it, but after talking to 50+ manufacturers we have learned that the manufacturing machines simply can’t produce a wider thicker product. Lastly when you are trying to save as much money as possible. The 20 gauge 54” clear vinyl is always the cheapest option. It is also the thinnest and will likely break down a little faster than the thicker 30 and 40 gauge options. Saying that we have a lot of happy customer who use the 20G on a regular basis with no problems.
30 Gauge Clear Vinyl
The 30G clear vinyl is commonly used in warmer climates where it does not get to extremely cold temperatures. This is also a common product to use for green houses. This product is about the same thickness as a credit card.
40 Gauge Clear Vinyl
The 40 gauge clear vinyl is most commonly used for better insulation. It’s twice as thick than the 20G clear vinyl measuring in at roughly 1mm thick. This product is best for high wind and extremely cold environments including moving cars and boats. The 40 gauge clear vinyl is a littler harder to sew due to its thickness, but can still easily be sewn with a heavy duty machine.
60/80 Gauge Clear Vinyl
These are really thick clear vinyls. People who use this want a really durable product and want to keep things really well insulated. It might be a bit of overkill, but some people really like to use the thickest material available.
Did we miss something?
There is clearly a lot to consider before starting this type of project. We would love your feedback. If something is confusing let us know and we will fix it. We will continuously be adding more pictures and helpful content based on your feedback. We might even try to find time to film a video to make it even easier to understand. We just wanted to get you as much information to help get you started.
Did we miss something? Do you still have questions? Email or call us (Support@MarineVinylFabric.com or (312) 300-6737)
Jennifer
This article is amazing. It has answered all of my questions I had about sealing in my porch this winter. The angle of my house and where the porch is located means the snow and wind come directly at us if we are sitting out there. Thank you for this!